7 Yoga Postures to Reduce Neck Strain

Find your silhouette looking more like Quasimodo than Quasi-straight? Smartphones are anything but smart on our posture, but these 7 yoga poses can help counteract all the unwanted side effects.

Forward Fold with Clasp

Forward-Fold-Clasp-Hands.jpg


  • Stand, clasp hands behind back, and take a big inhale to open the chest.

  • On the exhale, soften knees and fold forward, letting head fall toward the ground and gently releasing the neck.

  • If you feel comfortable, bend one knee and then the other, getting more into shoulders.

  • Turn head right to left to release neck. Stay here for 5 to 10 deep breaths.


Jalandhara Bandha, aka Throat Lock

Use the cross-legged variation or sit on your heels with your toe pads touching the floor.

Use the cross-legged variation or sit on your heels with your toe pads touching the floor.


  • Kneel with hands lightly resting on thighs.

  • Lift sternum and drop chin lightly, lifting through the top back of skull as if someone had a string on the back of your neck and was lifting you up.

  • Lengthen through the back of neck and keep shoulders down.

  • Breathe here for 5 to 10 deep breaths, lengthening the back and sides of neck each inhale and dropping shoulders a tiny bit more on each exhale.


Camel Pose

Place your hands on the posterior (back) edge of your hips if you can't reach your heels, keep your elbows drawn toward the mid-line of your body without touching them together.

Place your hands on the posterior (back) edge of your hips if you can't reach your heels, keep your elbows drawn toward the mid-line of your body without touching them together.


  • Begin in a high kneeling position with hips over and lined up with knees, and weight supported by shins and the tops of feet.

  • Place palms on sacrum—fingers facing up or down, whichever feels better, tailbone reaching down—and draw elbows into one another so that they aren't winged out.

  • Keep thighs rotating inward and pull shoulder blades toward one another and down back. Look to the ceiling as you lift chest upward.

  • Release hands to heels and arch spine. Tip head back to keep the whole spine in extension.

  • Breathe here for at least 5 deep breaths.


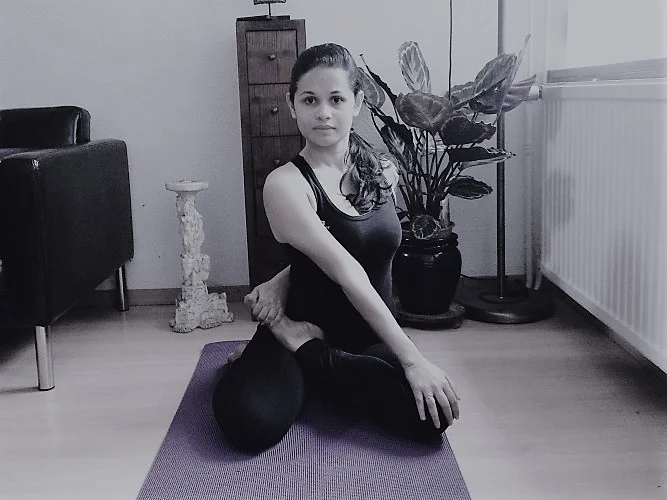
Sage's Twist

sage pose.jpg


  • Sit with legs long and in front of you. Bend right knee, and take the top of right foot and place it on the ground next to right butt, in half hero's pose.

  • Bend left knee, and place the top of left foot on top of right thigh, at hip crease, into half lotus.

  • Slightly twist torso to the left, take left hand behind sacrum on the ground, and then take right hand to the outside of left knee.

  • Take a big inhale to lengthen through spine, and use exhale to engage navel to spine and twist to the left.

  • Keep this breathing pattern for at least 5 deep breaths. Repeat on the other side.


Dolphin Pose

dolphin pose.jpg


  • Begin on hands and knees. Hold opposite elbows with hands to get them shoulder-width apart, then place forearms parallel to one another.

  • Drop head and reach chest back through arms in the direction of feet to enhance shoulder opening.

  • Stay here for 5 to 10 deep breaths.


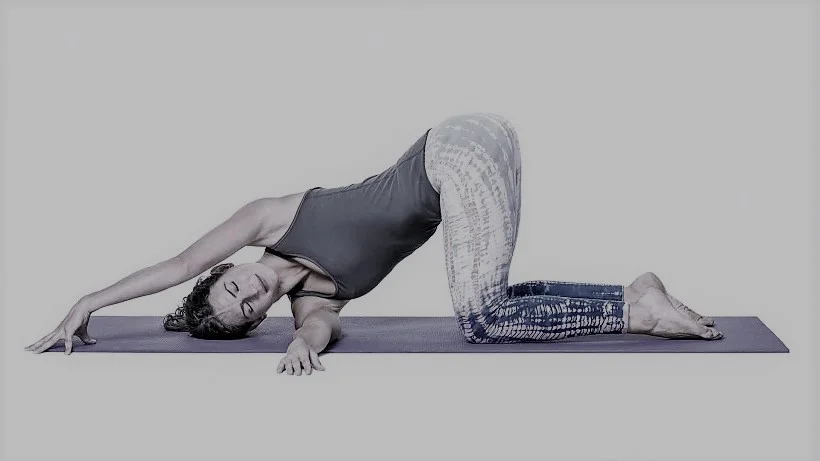
Thread the Needle

needle pose.jpg


  • Begin on all fours. Reach right arm underneath the body, allowing the right shoulder and temple to release to the ground.

  • Allow left hand to stay where it is or crawl it a bit to the right over to head.

  • For an extra neck stretch, look toward left armpit.

  • Stay here for 5 to 10 deep breaths. Repeat on the other side.


Supported Fish Variation

sfish.jpg


  • While sitting on the ground with legs in front of you, place a medium-height block behind you beneath where shoulder blades will lie.

  • Bend knees and place feet on the ground, hip-width apart.

  • Using arms, slowly lower upper back to gently rest on the block, adjusting placement until you are comfortable.

  • Ideally, the block is where your bra line would be. Next, clasp hands behind head and allow elbows and head to release toward the ground.

  • Stay here for at least 10 deep breaths.

This article originally appeared on Shape.com and was written by Heidi Kristoffer 

RW_Workshop_FB.jpg


Do you find these poses difficult? Do you need support in achieving them safely?
Join our upcoming NECK POINT AND COMMUNITY ACUPUNCTURE WORKSHOP, March 17, Saturday, 7pm. Learn how to use yoga and acupressure to eliminate neck strain! 60 minutes of yoga and 30 minutes of Acupuncture for neck & shoulder relief.
Only a few spots remain, register with a friend, perfect for beginners.
A Must Read For People in Pain: 'Explain Pain'

If I could make only one recommendation to individuals living with chronic pain, it would be to read the book Explain Pain by David Butler and Lorimer Moseley.

Directed at both clinicians who work with chronic pain patients and patients who live with chronic pain, Explain Pain shows how the discoveries of modern pain science can be put to practical use. Written in understandable language with a touch of lighthearted humor, Butler and Moseley take a complex subject and make it possible for the average person to understand and use. One client remarked that she thought it would be hard to read and was delighted that she did not find it difficult at all. 

Pain education can help

Research has demonstrated that pain education can help to reduce chronic pain. For instance, a recent study by the army followed 4,325 soldiers over a two year period and found that one session of pain education could help lower the incidence of low back pain. Understanding how pain works is not a magic bullet that will make pain go away immediately, but it can help to take some of the fear and anxiety out of the experience which can then begin to help alter the experience. With time, thinking a little differently about pain can lead to more successful strategies for reducing, limiting, and eliminating pain.  

Pain is useful and should not be ignored. Pain is a protective mechanism generated by the brain in response to perceived threat. However, when pain is chronic and there is no direct or immediate threat to the body, understanding how the body can get "stuck" in pain can suggest ways to help it get "unstuck." 

Butler and Moseley provide some amazing stories to illustrate the surprising discovery that pain is not directly related to tissue damage. While this concept may, at first, seem odd and difficult to grasp, they produce convincing evidence to support this idea. Consider this: a paper cut produces very little tissue damage, yet can cause a lot of pain. A soldier can get shot in battle, yet not realize he is injured until he is off the battlefield. Amputees may experience phantom limb pain in tissue that no longer exists. How does that happen? The part of the brain that corresponded to the amputated limb can still generate the sensation of pain, even after the limb is gone.

Pain can be influenced by context. If everyone around us seems to be in pain, we may also expect to be in pain. Athletes involved in vigorous sports ignore impacts that would upset most of us because to them it's all part of the game. In that context, it is expected and not a threat. 

Butler and Moseley describe how pain is generated by the nervous system. Understanding that pain is generated by the brain, rather than by damaged tissues, does not mean that pain is "all in your head" and should be ignored or dismissed as imaginary. In fact, understanding that pain is the body's alarm system highlights the importance of treating pain so that the alarm system does not become oversensitive. 

The book describes what happens in different systems of the body and how they may be affected by pain. Normal responses to painful stimuli are contrasted with what happens when the responses become altered. The influence of our thoughts and beliefs is examined for the role it can play in chronic pain.

Practical suggestions

The last few chapters of Explain Pain suggest practical tools that can be used to manage chronic pain. Using "the virtual body" is explained, as is the use of graded exposure to break the association between particular movements and pain and to cultivate successful movement without pain. 

Pain education should be part of every client or patient's rehabilitation.Explain Pain provides an excellent model for pain education.

One of my clients suffered for many years with a painful chronic condition and found this book immensely helpful. Although she had seen many doctors and therapists, she had never been given any pain education. After reading this book, she asked, "Why didn't anyone tell me this?" My response was, "They didn't know." Although Explain Pain was first published in 2003, pain science is still only slowly finding its way to practitioners. 

Since I've begun studying pain science, I've incorporated information the information presented in Explain Pain into my practice. It has been a useful tool for helping clients get out of pain and feel in control of their lives once again.

Additional resources

I've posted a fifteen minute TED Talk by Lorimer Moseley on Why Pain Hurts in a previous post. There is also, in the same article, a forty-five minute lecture to a professional audience for those geeky folks who want to understand details about the biology of pain. Recently, I've found a twenty-five minute video by Moseleywhich has become a favorite because he addresses how we think about conditions like herniated discs and how our thinking can feed and perpetuate fear, anxiety, and pain. If you watch only one of these videos, this is the one I recommend. These videos are educational and entertaining. Moseley, who is both researcher and clinician, has a charming Australian accent and a great sense of humor. Imagine Crocodile Dundee giving an introduction to pain science and you'll get the picture.

For more information about understanding pain, I also suggest the following: 

Painful Yarns by Lorimer Moseley (stories to help understand the biology of pain)

Also, check out this article about understanding how pain works by Paul Ingraham of SaveYourself.ca. 

Cory Blickenstaff, PT, has put together some useful videos of "novel movements." Here are links to the ones on the low back, neck, and hand, wrist, forearm, and elbow. 

This article originally appeared massage-stloius.com and was written by 'Ask the Massage Therapist'.